


Redis Labs Experiences 63% Customer Growth with Redis Enterprise Cloud on AWS
Learn more


Today we are pleased to announce the availability of the HashiCorp Terraform Redis Enterprise Cloud provider. While development teams embrace more and more DevOps principles such as continuous integration/continuous delivery (CI/DC), the need to manage infrastructure as code has become almost a must-have capability for any cloud service. A leading tool in the infrastructure as code space is HashiCorp Terraform, supporting the major cloud providers and services with its providers and modules cloud infrastructure automation ecosystem for provisioning, compliance, and management of any cloud, infrastructure, and service.
If you’re not familiar, Terraform is a tool for building, changing, and versioning infrastructure safely and efficiently, managing everything with code. Configuration files are used to describe the components needed to run your application. Terraform can manage almost any infrastructure component, including bare metal, virtual machines, cloud instances, and many other popular Infrastructure-as-a-Services (IaaS) services. Components in your application stack are represented as resources in Terraform. A Terraform provider is responsible for understanding API interactions of the relevant resource and exposing the resource’s features out to the world.
To meet this increasing demand, Redis has developed a Terraform provider for Redis Enterprise Cloud. The HashiCorp Terraform Redis Enterprise Cloud Provider allows customers to deploy and manage Redis Enterprise Cloud subscriptions, databases, and network peering easily as code, on any cloud provider.
To demonstrate how the Redis Enterprise Cloud’s Terraform Provider works and what it can do, let’s create a sample subscription with two databases, one of them using the RedisJSON module.
Prerequisites:
Let’s start by storing our Redis Enterprise Cloud API keys as environment variables:
$ export REDISCLOUD_ACCESS_KEY=<your API access key>
$ export REDISCLOUD_SECRET_KEY=<your API secret key>
Now let’s create a new folder and place the Terraform HCL file shown here. Let’s call the file rediscloud-tf-example.tf:
terraform {
 required_providers {
   rediscloud = {
     source = "Redis/rediscloud"
     version = "0.2.0"
   }
 }
}
# Provide your credit card details
data "rediscloud_payment_method" "card" {
 card_type = "Visa"
 last_four_numbers = "1234"
}

# Generates a random password for the database
resource "random_password" "passwords" {
 count = 2
 length = 20
 upper = true
 lower = true
 number = true
 special = false
}

resource "rediscloud_subscription" "example" {
 name = "Demo"
 payment_method_id = data.rediscloud_payment_method.card.id
 memory_storage = "ram"

 cloud_provider {
   #Running in AWS on Redis resources
   provider = "AWS"
   cloud_account_id = 1
   region {
     region = "eu-west-1"
     networking_deployment_cidr = "10.0.0.0/24"
     preferred_availability_zones = ["eu-west-1a"]
   }
 }
 database {
   name = "redis-db"
   protocol = "redis"
   memory_limit_in_gb = 1
   replication = true
   data_persistence = "none"
   throughput_measurement_by = "number-of-shards"
   throughput_measurement_value = 2
   password = random_password.passwords[0].result
 }
 database {
   name = "db-json"
   protocol = "redis"
   memory_limit_in_gb = 1
   replication = true
   data_persistence = "aof-every-1-second"
   module {
       name = "RedisJSON"
   }
   throughput_measurement_by = "operations-per-second"
   throughput_measurement_value = 10000
   password = random_password.passwords[1].result
 }
}
The next step is to initialize the terraform environment by running this command:
$ terraform init
The result should like like this:
...
Terraform has been successfully initialized!

You may now begin working with Terraform. Try running "terraform plan" to see
any changes that are required for your infrastructure. All Terraform commands
should now work.
...
After Terraform has been successfully initialized, run the following command to have Terraform create the plan:
$ terraform plan
The output should look similar to this:
...
Plan: 1 to add, 0 to change, 0 to destroy.
...
Now let’s have Terraform do its magic and provision our databases:
$ terraform apply
The terraform apply command might take several minutes to complete once finished, it should produce a result that looks like this:
…
rediscloud_subscription.example: Creation complete after 8m16s [id=103873]
Apply complete! Resources: 1 added, 0 changed, 0 destroyed.
...
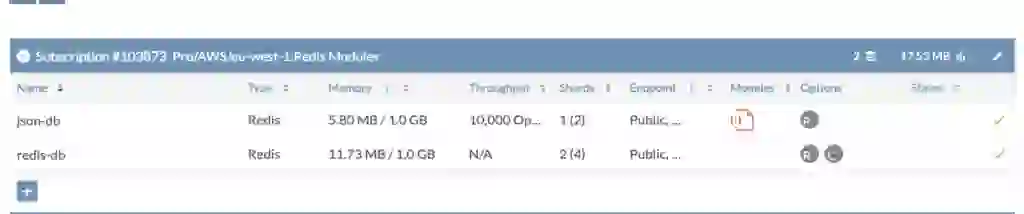
As you can see, we have now provisioned two new databases. All you have to do is to grab the database’s endpoints and plug them to your application. You can also use RedisInsight, the GUI for streamlined Redis application development, to connect and explore your data.
The Redis Enterprise Cloud console displays the new subscription and database:
Once you are done having fun with your database you can tear down everything by running this command:
$ terraform destroy
We’ll continue to extend the capabilities of the HashiCorp Terraform Redis Enterprise Cloud Provider. If you have an idea or feature you’d like us to support in the provider or you find a bug, please let us know by opening an issue in our GitHub repository. You can also drop us a line at pm.group@redis.com.
For production use cases, we also recommend using Terraform Cloud, which is HashiCorp’s cloud-based offering for Terraform. This will enable you to store credentials in a secure environment out side your configuration file and source control. Terraform Cloud also comes with collaborative features such as free remote state storage, custom workspace permissions, version-control system integration, as well as policy as code. You can sign up for free at terraform.io/cloud.